
 Yes, yes, I know the posts have been few and far between recently. In the interest of placating my more rapid readers (and of course showing off, just a wee bit), I've decided to share a bit of what has been keeping tied to the air compressor, and away from the keyboard.
That's right folks, the Dragon is done playing with his wood!
Now the whole of the Steampunk Vespa, which I am affectionately dubbing "The Brazen Filly" at this point, is not yet complete... there are a few more details that need attending to before I unveil the whole thing. But the wood-graining is complete, and that was the most labor intensive part of the project. I'm feeling pretty confident, that she will be completed in time for AmeriVespa.
Now this sneak peek is just of the Filly's fairing. Painting the fairing is pretty much completed, and it has been hit with an initial clearcoat. I have to say I was really pleased by how the glossy clear really brought to life all the playing I did with transparent and iridescent layers. Of course this is an effect that doesn't really photograph well, especially without some nice studio lighting. But if you compare the two closeup photos below, you'll get some sense of it. When the whole scooter is complete I'll get some video of it, so you can see how the undertones shift with your perspective as you walk around it.

 Being a Steampunk Scooter, sometimes fantastic elements were chosen over realism. Wood grain patterns were mostly taken from samples of cedar, which surround my workspace since it is constructed of a recycled barn. For me one of the great joys of realistic painting is getting a sense through this kind of study, of what makes wood look like wood, and not only replicating examples which are before your eyes, but also trying to apply the visual lessons of such study to drawing from the imagination. What you see on the fairing are experiments in imaginative wood, while representations of the wood around our house were used more on the cowls and topcase. (But those will have to wait until the scooter is finished for unveiling.)
For the finish/coloring I drew from several samples of vintage rosewood which Jes has around the house. So the wood is not totally realistic, but I think it works quite well for this project. I definitely enjoyed this process, and look forward to building a repetoire different types of wood. (Jes is already hinting that her Sprint might look good rendered in bird's eye maple.)
 I've been working on this faux-wood finish for about two months, and for the last couple weeks putting in twelve hour days on it. At the end of each session, I'd tell Jes, "I think I just need one more day to finish, just one more layer." Heh, heh, heh...
But for my first attempt at DIY airbrush woodgraining, and as part of my first custom scooter paint job, I think it came out pretty good.
 I meant to document this whole process, step-by-step, but as time went by, I just got so obsessed with finishing the dang-blasted thing, I quit taking pictures. Regardless, with the pictures below, and some explanation, you can be well on your way to airbrushing your own fake-wood.
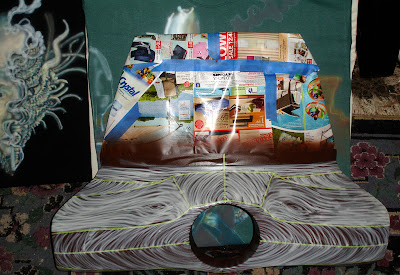 The first step, which isn't pictured here was priming the surface. I cleaned it, lightly hand sanded with fine grain paper (400 I think). Then I primed it with brown Krylon Fusion paint, since the fairing is fiber glass. After curing, the primer was lightly sanded, and I used 1/16th inch painter's tape to delineate the panels.
As a starting point I used directions from Craig Fraser's Cheap Tricks and Special Effects for painting wood grain. He recommends beginning on a black surface, and starting the grain lines in white. He also is painting with urethanes, which I unfortunately don't have to facilities to use. So anyway, I started with Golden Artists Colors fluid Titanium Buff, thinned of course for running through the airbrush. I think my mixture at this point was like 5 parts Titan Buff to 1 part Airbrush Transparent Extender, 1 part Gac 200, and 3 parts Airbrush Medium.
I think I did like two passes with this off-white mixture, for even coverage, and it's important to remember that at this stage you are just establishing the foundations of your textures. Getting really fine lines are not as important as getting the flow of the grain.
 The next layer as you can tell was yellow. (See all those hints and tricks learned in other media do apply, glaze from light to dark.) I don't remember the exact paint recipe for this layer, something along the lines of 1 part Titan buff, 2 parts Iridescent Gold Fine, and 2 parts Primary Yellow, thinned with 1 part Airbrush Transparent Extender, and 4 parts Airbrush medium. (All paints and mediums are from Golden Artist Colors, and all paints were from their Fluids line. If you really want to develop a relationship with your paint, I can't recommend Golden highly enough, the more you learn about paint chemistry, and weird world that is color theory versus color practice, the more you will appreciate Golden.)
Per Craig Fraser's directions, I pretty much covered up the white layer with the golden-yellow. This is not done by tracing over the white, so much as following the flow of the grain you have already established. Of course, like always in airbrushing, several light passes are superior to one heavy coat.
After the yellow-gold, came a golden orange coat, which consisted of Quincridone Gold mixed equally with the iridescent gold and these mixed equally with my ususal airbrush thinning mix. (Maybe there was some Titan Buff and Yellow Oxide in there, as well.)
Actually after this point my color mixtures became somewhat arcane, and convoluted. My palette consisted of Quin Gold, Burnt Sienna, Violet Oxide, and Quin. Burnt Orange mixed with varying degrees with Irid. Gold, Interference Oxide Red, Interference Oxide Green (YS), and Irid. Bronze (fine). I finished off with several transparent layers mixed from Jenkins Green, Quin Burnt Orange, Permanent Violet Dark, Pyrrole Orange, and Primary Yellow. These mixtures were deep reddish or purplish transparent browns. At full strength they are almost black.
Oh, and if you are going to try this, please wear a mask. Several of these pigments are particularly nasty when inhaled.
6 comments:
wow! bravo! That wood grain looks amazing. Excellent job!
Yeah, it's funny how paint and color theory don't always match up. For instance, in color theory when you mix all of the colors together you get white but if you mix every paint color together, you get black!
Nice work.. looks amazing! Wish I could make it to AmeriVespa to see it. Guess I'll just have to wait until you unveil the whole thing online.
Cheers,
Robert
JOY!
I CAN'T WAIT TO GET MY GRUBBY LITTLE EYES ON IT!
fuckin' a big bad ben! lookin' sweet! I'll try to stop by whenever I've got my car back
It's beautiful Ben. I love woodgraining, I bet it's been amazing with the airbrush.
You gonna bring her up for the Vespathon?
That is awesome! Rosewood is, perhaps, my favorite decorative wood. Too bad that it's getting hard to find.
John
Post a Comment